Saturday, August 29, 2015

WCF Service without .svc file or Configuration Based Activation in WCF


Normally when we create a wcf service, we have the .svc file added into it. As per MSDN, the reason we have the .svc file is:

"In .NET Framework 3.5, a .svc file was required for activating a service. This caused additional management overhead, because an additional file was required to be deployed and maintained along with the application. With the release of .NET Framework version 4, the activation components can be configured using the application configuration file."


As the link says, with .Net framework 4.0 and above, we do not need the .svc file in wcf and still create the service. So the required service activation can be done using some configuration settings in the config files. This is through the use of <serviceActivations> tag in the configuration file. Let's see how we can do this:


So we create this sample with a simply ClassLibrary project type. We call it as WCFConfigBasedActivation. Add reference to the System.ServiceModel.dll from the Assemblies. Next, we add a interface named IServiceContract with a method which takes 2 integer parameters as input and returns their sum. Add the ServiceContract and OperationContract on the class and the method respectively. You can read about the contracts in wcf here.


    [ServiceContract]
    public interface IServiceContract
    {
        [OperationContract]
        Int32 GetSum(Int32 a, Int32 b);
    }

Add a new class named Service.cs, which implements this interface. So our implementation will look like:


    public class Service : IServiceContract
    {
          Int32 IServiceContract.GetSum(Int32 a, Int32 b)
          {
               return a + b;
          }
    } 

Next, add an empty asp.net application within the same solution. This application is be to used as a host for the service. So add the reference to the service library project that we created in the start of discussion. So our solution will look like the following:


Now, without adding any page, run the application and append Service.svc to the browser url and see if you can view the service.


You can't. It says 404 error, as the service was not activated by the host (due to missing .svc file). Now let's go to host configuration file and add the settings which can activate the service. So we add the following settings:


 <system.serviceModel>
    <serviceHostingEnvironment >
      <serviceActivations>
        <add factory="System.ServiceModel.Activation.ServiceHostFactory" relativeAddress="Service.svc" service="WCFConfigBasedActivation.Service" />
      </serviceActivations>
    </serviceHostingEnvironment>
    <behaviors>
      <serviceBehaviors>
        <behavior>
          <serviceMetadata httpGetEnabled="true"/>
        </behavior>
      </serviceBehaviors>
    </behaviors>
  </system.serviceModel>


Now run the application again and add the Service.svc to the browser url and see. Bingo, this time it works.


Easy to implement isn't it. 
We could have used the WCF Service Library project template also for creating the service project rather then the typical ClassLibrary project template.

Hope you enjoyed reading it. Happy coding...!!!

Friday, August 21, 2015

WCF Service self hosting


Next in our series of discussion about wcf services, we will now discuss the concept of self hosting a wcf service. If you have missed the previous articles, you can read them on the links below, which is complete series starting from ABC of wcf services till their hosting types:


  1. About the A.B.C. of WCF Service
  2. Types of Contracts in WCF
  3. WCF Proxy generation using 'Add reference'
  4. WCF Proxy generation using 'SvcUtil.exe'
  5. WCF Proxy generation using 'Channel Factory'
  6. WCF Proxy generation using 'Client Base'
  7. Hosting WCF Services in IIS

In self hosting type of approach, the service can be hosted in any windows application or in a windows service.There is no use of IIS in this approach. So let's start with the code. 

We create a new project named TestService. We remove all the default methods and add a simple method which takes two integer input parameters and returns their sum.  So we have the following service contract. 


namespace TestService
{
    [ServiceContract]
    public interface IService1
    {
        [OperationContract]
        Int32 GetSum(Int32 a, Int32 b);
    }
}

And our interface implementation will look like:

namespace TestService
{
    public class Service1 : IService1
    {
        Int32 IService1.GetSum(int a, int b)
        {
            return a + b;
        }
    }
}

Next, in order to host the service, we add a new ConsoleApplication to the solution and call it as TestServiceHost. Also we need to add the service project reference to the console application project.


Now in order to host the service, when this console application starts, we will write the code in it's Main function. The code will be basically to define the ABC of the service, i.e. Address where service is, Binding to be used for communication and Contract to be used for communication. If you would like to know more about the ABC of WCF, then you can read it about here

For this purpose, we will be using the ServiceHost class. So our code will be like the following:

namespace TestServiceHost
{
    class Program
    {
        static void Main(string[] args)
        {
            Uri _baseAddress = new Uri("http://localhost:14895/Service1");

            // Configure the Address
            var _svcHost = new ServiceHost(typeof(TestServiceService1), _baseAddress);

            // Define the Binding and the Contract
            _svcHost.AddServiceEndpoint(typeof(TestServiceIService1), new BasicHttpBinding(), "");

            // Start the service
            _svcHost.Open();

            Console.WriteLine("Service started at : {0}", _baseAddress);
            Console.ReadKey();
        }
    }
}

That's it. Service is ready to be hosted now. Simply run the application and service is started. 


In order to test the service, we will use the wcftestclient. Start the Visual Studio command prompt and type wcftestclient.exe. This will open the test client. Right click on My Service Projects and select Add Service. Enter the url of the service which we defined in the configuration in console application. 


Double click on the GetSum method and provide the input parameters for a and b. Click Invoke and see the results


And we have the results. So we can use any of the client applications instead of the wcftestclient. This can be any client application consuming the service using SOAP, by adding the reference or calling it through the ChannelFactory

Hope you enjoyed reading it. Happy coding...!!! 

Saturday, August 15, 2015

WCF Service hosting in IIS


Continuing with the series of discussion on the wcf services, we will now start with the discussion with options for hosting wcf services. We started with ABC of wcf service, then its contract types, further with the techniques to generate the proxy classes. Now we will focus on the hosting techniques. You can read the complete series on the links below:
  1. About the A.B.C. of WCF Service
  2. Types of Contracts in WCF
  3. WCF Proxy generation using 'Add reference'
  4. WCF Proxy generation using 'SvcUtil.exe'
  5. WCF Proxy generation using 'Channel Factory'
  6. WCF Proxy generation using 'Client Base'
There are multiple options for hosting a WCF service. These include the use of :

1. IIS Hosting
2. Self hosting
3. Windows Activation Service hosting
4. Windows Service hosting

In this article, we will discuss about the concept of IIS hosting. Hosting the wcf in IIS is same as that of hosting your web applications. So to start with, we add a new project of the type WCF service application and NOT wcf service library. There is a difference between the two. We will not get into the details of these two. So for now, let's simply add that project.


Next we remove any built in functions from the service interface and implementation, to add our simple method which can return a String value. So our service interface will look like below:


   namespace WCFIISHosting
   {
     [ServiceContract]
     public interface IService1
     {
         [OperationContract] 
         String GetString();
     }
   }


And our service implementation will become:

 
  namespace WCFIISHosting
  {
     public class Service1 : IService1
     {
         String IService1.GetString()
         {
             return "String from Service";
         }
     }
  }


So our service part is done. Now we need to simply host it in IIS. So start the IIS and add a new Application type, under the Default Website, by right clicking on it. See the screenshot below:


Provide a name to it and set the Physical Path to the root folder of the service code and click Ok. 


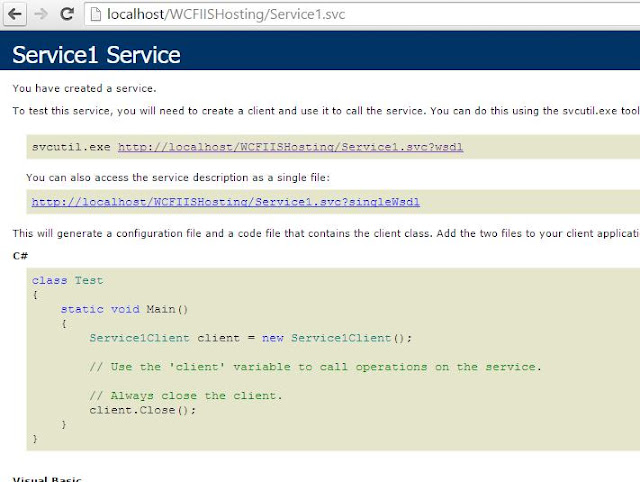
That's it, wcf is hosted now. Open the browser and browse the link:   

                                http://localhost/WCFIISHosting/Service1.svc


Now let's try to consume this any application. So for this, we add a new Console Application in the same solution and add it's service reference to the project.


Next, create the proxy instance and call the service method GetString() using it.

  
 namespace ConsoleApplciation1
 {
    class Program
    {
        static void Main(string[] args)
        {
            ServiceReference1Service1Client _obj = new ServiceReference1Service1Client();
            Console.Write(_obj.GetString());
            Console.ReadKey();
        }
    }
  }


Run the code and see the results. The results are available.


 Easy to host, isn't it. Happy coding...!!!

WCF .svc file getting downloaded when browsed though IIS

Recently i was trying to host the WCF service in IIS. The service got created fine and was able to run it in the localhost. However, when I hosted the service in IIS and tried browsing it, the service file i.e. the .svc file started to get download instead of getting opened up. 


Tried many things on internet but it didn't worked. Finally decided to check the windows features turned on or off. I found the following settings to be un-checked and decided to enable these features.


Check these features and then click 'OK'. This will enable these features and then re-start the IIS using iisreset command on the command prompt, to apply the changes. Check again and it should work fine now. Hope this helps others also.


Tuesday, August 11, 2015

WCF Proxy generation using ClientBase


This is the final wcf proxy generation technique that we will discuss in our series about wcf services. It will be on how we can generate the wcf proxy using the ClientBase class. We will be using the same service which we created in our previous discussions. If you have missed the other articles, then here are the links for the series:
  1. About the A.B.C. of WCF Service
  2. Types of Contracts in WCF
  3. WCF Proxy generation using 'Add reference'
  4. WCF Proxy generation using 'SvcUtil.exe'
  5. WCF Proxy generation using 'Channel Factory'

before we start, we exclude the Service client that we generated in the previous discussion and add a new class named ClientBaseProxy


Next, we inherit the ClientBase<T> class where the type T is our service interface type i.e. IService1. This class will basically help us to connect with the service and call it's methods. We also implement the service interface IService1. 


   namespace WCFClient
   {
     public class ClientBaseProxy : ClientBase<IService1>, IService1
     {
        public Int32 GetSum(Int32 a, Int32 b)
        {
            return base.Channel.GetSum(a, b);
        }
     }
  }


In this implementation, we use the  base.Channel method from ClientBase to call the GetSum method in IService1. This becomes possible as we have declared the ClientBase to be of type IService1. So we are able to access it's methods. 

Next we add the binding and the endpoint settings in the client config file. We had removed these settings when we used the proxy generated through the SvcUtil.exe tool. So our config file looks like following:

<?xml version="1.0" encoding="utf-8" ?>
<configuration>
    <startup> 
        <supportedRuntime version="v4.0" sku=".NETFramework,Version=v4.5" />
    </startup>
  <system.serviceModel>
    <bindings>
      <basicHttpBinding>
        <binding name="BasicHttpBinding_IService1" />
      </basicHttpBinding>
    </bindings>
    <client>
      <endpoint address="http://localhost:13490/Service1.svc" binding="basicHttpBinding"
          bindingConfiguration="BasicHttpBinding_IService1" contract="ISampleServiceInterface.IService1"
          name="BasicHttpBinding_IService1" />
    </client>
  </system.serviceModel>
</configuration>


So now simply we create an instance of the proxy class and call it's methods, which in-turn, call the actual service method using the base.Channel. See the code below:

    
    ClientBaseProxy _proxy = new ClientBaseProxy();
    Console.WriteLine("Sum is: " +  _proxy.GetSum(12, 2));
    Console.ReadKey();


Simply run the application and see the results. 


Easy to create isn't it. Happy coding...!!!

Tuesday, August 4, 2015

WCF Proxy generation - using ChannelFactory


Next in our series about wcf service, we will now discuss how we can generate the wcf proxy using the ChannelFactory class. If you have missed the series, then here are the links for the series:


  1. About the A.B.C. of WCF Service
  2. Types of Contracts in WCF
  3. WCF Proxy generation using 'Add reference'
  4. WCF Proxy generation using 'SvcUtil.exe' 
So let's start with it. As per MSDN, ChannelFactory class is:


A factory that creates channels of different types that are used by clients to send messages to variously configured service endpoints.
This approach has the big advantage that we need not add the Service Reference to our client application, like we did in our very first discussion article. But this approach requires one very important thing, which is sharing of the ServiceContract between the client and service so that the channel can be created, based on the contract (which the service provides), between the client and service. So this makes it very important to use the concept of interfaces which can be shared between the two in a de-coupled manner. So let's start with the discussion.
We will use the same service which we used in our previous discussions. But make sure that we have removed the service reference from the project. Also we remove all the binding and endpoint configuration from the config file. We will be setting these values in our C# code.
But before we start, we move the service interface i.e. IService1 to separate project. The reason, as we discussed above, we need to have the service contract to be available in both client and service itself and adding the reference to the service project does not makes any sense. So, we add a new class type project, move the interface IService1 to this project and add it's reference to both service and client projects. So our project structure changes to:
WCF Proxy using ChannelFactory
Next, we write the code to create binding to be used, the endpoint to be used and create a ChannelFactory<T> instance type, where T is of type IService1. From this channel factory created, we get the channel of type IService1 and use this to invoke the service method  
 static void Main(string[] args)
        {
            BasicHttpBinding _basicHttpBinding = new BasicHttpBinding();
            EndpointAddress _endpoint = new EndpointAddress("http://localhost:9999/Service1.svc");

            ChannelFactory<IService1> _channelFactory = new ChannelFactory<IService1>(_basicHttpBinding, _endpoint);
            IService1 _channel = _channelFactory.CreateChannel();

            //Call the service operation
            Console.WriteLine("Sum is: " + _channel.GetSum(13, 5));

            //Close the channel Factory
            _channelFactory.Close();

            Console.ReadKey();

        }

Run the code and you can see the results.
WCF Proxy using ChannelFactory
Easy...!!! Isn't it. Happy coding...!!!

Saturday, August 1, 2015

Run time error in Global.asax : Line 1: <%@ Application Codebehind="Global.asax.cs"

I was working on a webapi project and created it successfully. It seemed to be all right, until I hosted it in the application. After hosting, browsed the api and got an error of type


Description: An error occurred during the parsing of a resource required to service this request. Please review the following specific parse error details and modify your source file appropriately. 

Parser Error Message: Could not load type 'Example.WebAPISample' 

Source Error: 


Line 1:  <%@ Application Codebehind="Global.asax.cs" Inherits="Example.WebAPISample" Language="C#" %>


The error was pointing it to be an issue with the Global.asax file. Googled it and found that build action for the project should output the result to "bin" folder rather than "bin/debug" (was something like that).

I checked this option and found that was also fine. So before giving it up, gave a one last try. Cleaned the solution and build it and it worked. For some reason, the solution wasn't getting build properly earlier. But this time it worked and solution got built successfully. Browse the application and this time it worked fine. 

So this was one of the cause of issue with my application. Hope it helps others for whom the other option is not working. Happy coding...!!!